User Guide
Social Worker’s Efficiency Enhancer (SWEE) is a desktop application for managing your contact details, optimized for use via a Command Line Interface (CLI) while still having the benefits of a Graphical User Interface (GUI).
If you can type fast, SWEE can get your contact management tasks done faster than traditional GUI apps.
This is ideal as you do not often bring a mouse out with you on site visits to clients or on the go.
Who is it for and what can it do for me?
This application is intended for people involved with social work, social workers, volunteers, and community partners who have a need to manage contacts and their associated information. We offer a quick way for you to store their name, address, phone number, email and notes about them. We also support tagging contacts for easier searching. Additionally, we offer a way to keep track of upcoming appointments with them.
Table of contents
- Who is it for and what can it do for me?
- Table of contents
- Quick start
- Summary of Commands
-
Features
- Viewing help :
help - Adding a client:
add - Listing all clients :
list - Editing a client :
edit - Viewing a client’s information:
view - Locating clients by name:
find-name - Locating clients by tag:
find-tag - Deleting a client :
del - Clearing all entries :
clear - Exiting the program :
exit - Scheduling an appointment:
sched - Unscheduling an appointment:
unsched - Saving the data
- Editing the data file
- Viewing help :
- FAQ
- Known issues
Quick start
Glossary of terms
| Terms | Meaning |
|---|---|
| Java | Java is a platform that SWEE is built in, by installing Java you give your computer the ability to understand and carry out instructions that make up this app. |
| Application | Also known as app or software, in this user guide it mainly refers to the application, SWEE. |
| Parameters / Options | User given specifics for an instruction. For example, the index of a client to update. Some parameters are optional meaning they can be left out. |
| Client | Used interchangeably with contacts, in a social work setting, it normally refers to the person a social worker is serving. |
| Keyword | Refers to a predefined word or series of character used to denote something. |
| Command | Instructions for SWEE to do something. They can include keywords and parameters. |
| Directory | Commonly called a folder. |
| Index | Refer to the index number of something. If something is the second item, its index is 2. |
| GUI | Graphical User Interface, the desktop application the user sees |
| CLI / Command line | An application that presents a text only interface, e.g. PowerShell, cmd, Terminal on Windows, Bash or Shell in Linux, Terminal in MacOS. |
💡🚨 Note that some screenshots may be outdated as the application constantly evolves. However, you will still be able to get the full use and understanding from the information displayed in the GUI.
Setting up the application
-
Ensure you have Java
11or above installed in your Computer. You can find a copy here. Java is needed to run the applications. -
Download the latest
SWEE.jarfrom here. We will refer to it as the jar file or the application from now on. -
Copy the jar file to the folder you want to use as the home folder for your AddressBook.
- Open the application in a way that suits your operating system. For example, on Windows, you can just double-click the file.
Shortly after, a graphical interface (GUI) like the one shown below should pop up. Take note that the app already includes some example data for you to see.
- On first launch, it will present you with some example clients to show you a rough idea of how clients will look like.
Feel free to delete them and add your own. They are used in the New User tutorial. - This home folder will contain files generated and used by SWEE.
- 🚨 In case double clicking does not work, open a command line terminal in the home directory and run
java -jar SWEE.jar
- Open the application in a way that suits your operating system. For example, on Windows, you can just double-click the file.
-
Type the command in the command box and press Enter to execute it. e.g. typing
helpand pressing Enter will open the help window.
Refer to the New user tutorial -
Refer to the Features below for details of each command.
-
💡🚨 Note that some screenshots may be outdated as the application constantly evolves. However you will still be able to get the full use and understanding from the information displayed in the GUI.
New User Tutorial
If you are a new user you can follow this tutorial and get a quick rundown of the application and its core features!
This assumes a fresh installation of SWEE with the example clients serving as an example.
For a detailed rundown of each command, please refer to the Features section that is after this tutorial.
Introduction to the user interface
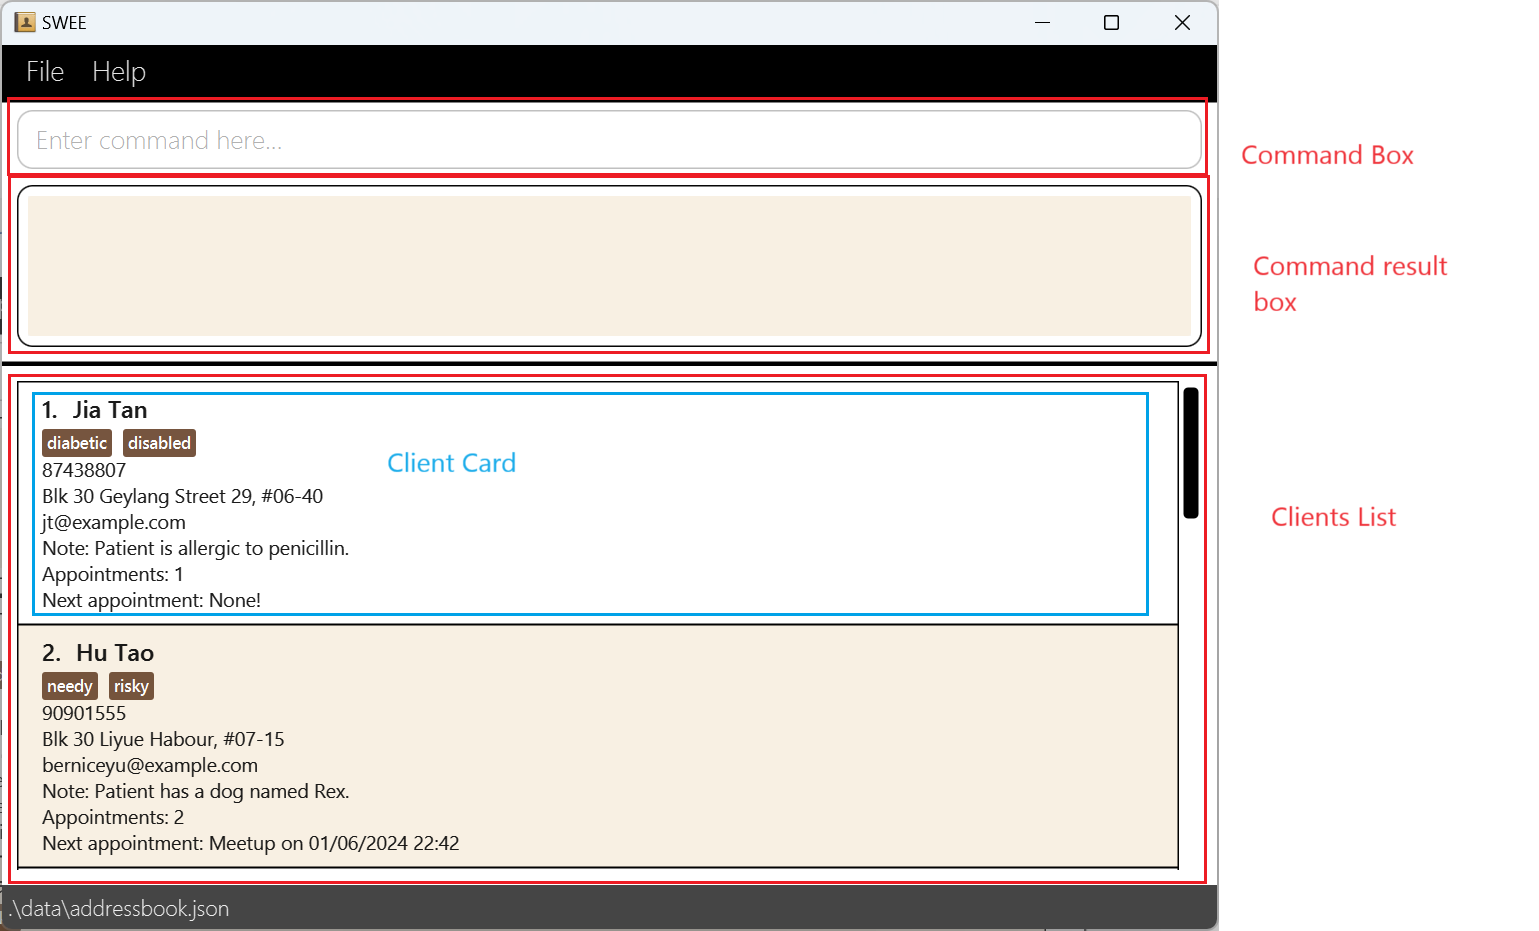
The user interface is primarily divided into 4 regions are shown by the different boxes.
- This is the Command Box. Commands are typed here and carried out by the application.
- Messages from the command that was just ran are displayed here. If the command runs into a problem, it will be displayed here as well. For example if the user typed in an invalid command or something unexpected caused the program to not work.
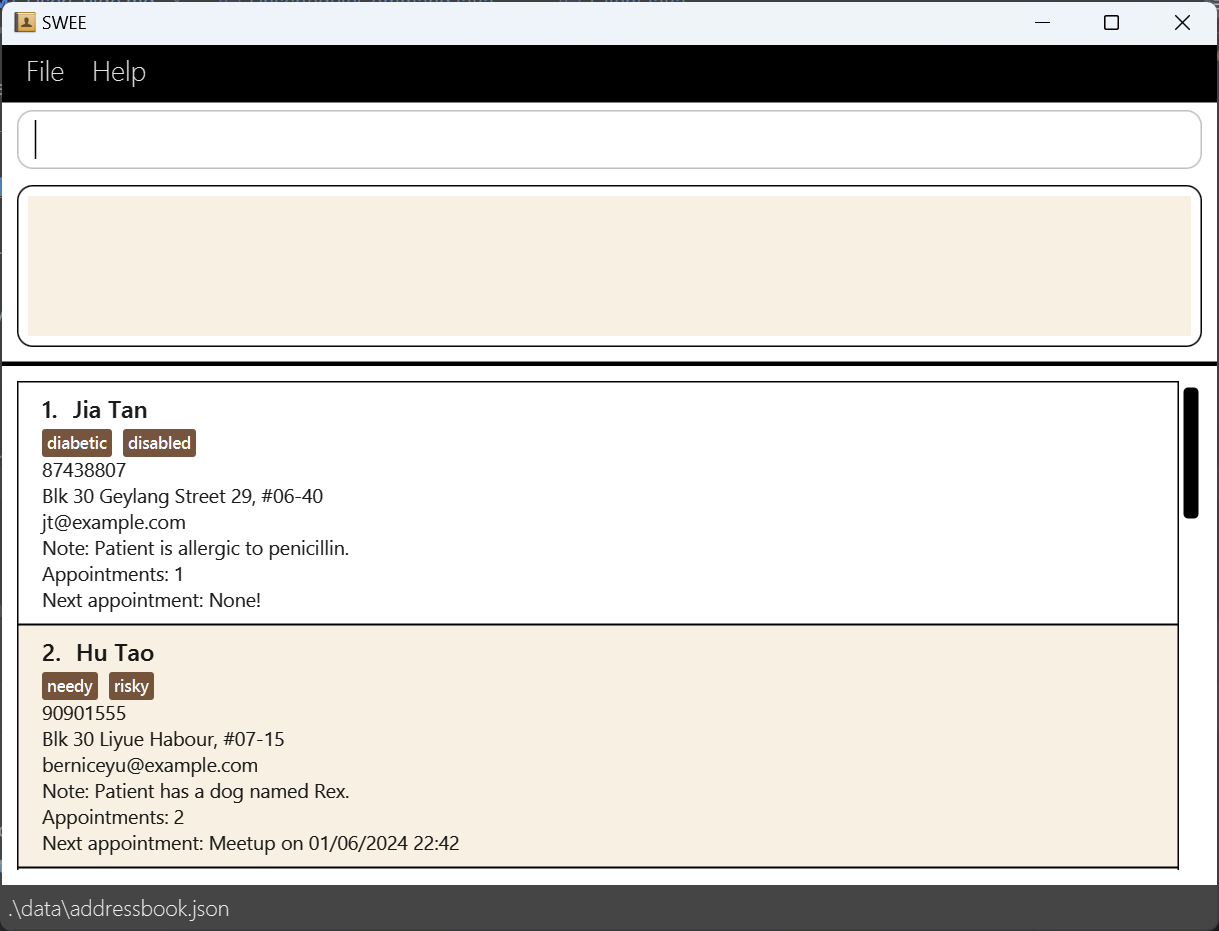
- This is the client list. Clients are displayed here in cards, see below. It is scrollable meaning you can navigate down and up like a webpage or word document.
- A Client card holds information relevant to each client. The number beside the names of each user is the index. This index is used in some commands to specify the client being edited. The words in brown boxes are tags a client have. It shows all their details along with the number of appointments and next upcoming appointment if any.
![]() Notes about the command format and screenshots:
Notes about the command format and screenshots:
-
Words in
UPPER_CASEare the parameters to be supplied by the user.
e.g. inadd --name=NAME,NAMEis a parameter which can be used asadd n/John Doe. -
Items in square brackets are optional.
e.g--name=NAME [--tags=TAG]can be used as--name=John Doe --tags=friendor as--tags=John Doe. -
Items with
… after them can be used multiple times including zero times.
e.g.[--tags=TAG]…can be used as--tags=SECDC,--tags=NECDC --tags=FinAidetc. -
Parameters can be in any order.
e.g. if the command specifies--name=NAME --phone=PHONE_NUMBER,--phone=PHONE_NUMBER --name=NAMEis also acceptable. -
Extraneous parameters for commands that do not take in parameters (such as
help,list,exitandclear) will be ignored.
e.g. if the command specifieshelp 123, it will be interpreted ashelp. -
If you are using a PDF version of this document, be careful when copying and pasting commands that span multiple lines as space characters surrounding line-breaks may be omitted when copied over to the application.
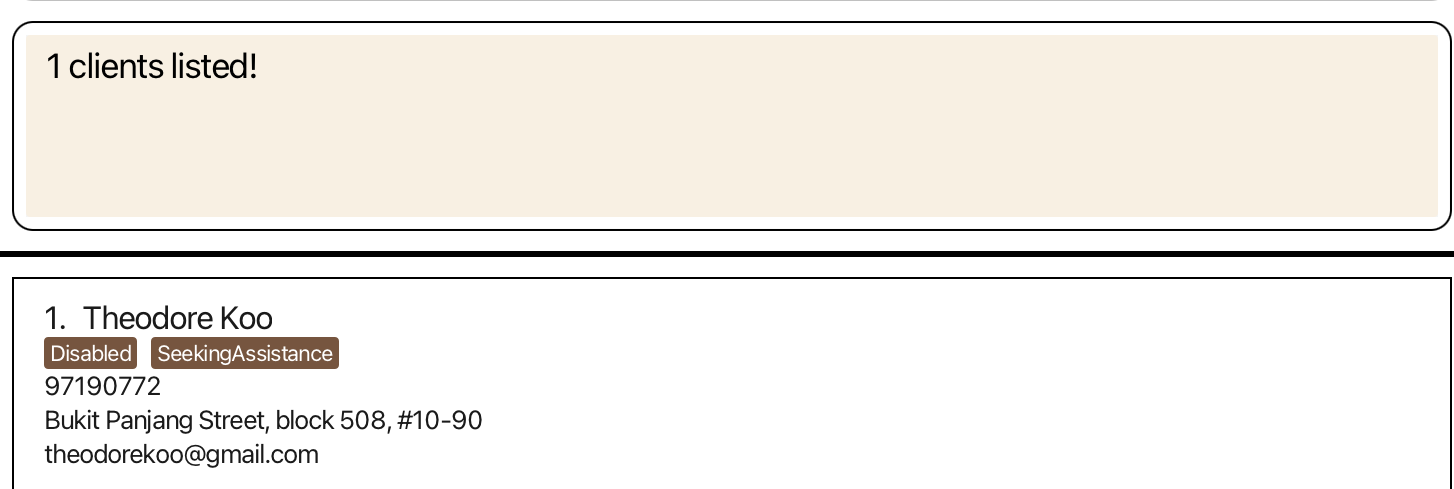
Adding a new client
Lets start by adding a new client. You can copy the command below for an example:
add --name=Theodore Koo --phone=98001715 --email=theodore@example.com
--addr=Prince Street, Block 144, #19-14 --tags=Disabled --note=Lactose Intolerant
-
addThis is the command for adding new contacts. -
--name=Theodore Koospecifies the name parameter as Theodore Koo. -
--phone=98001715specifies the phone number. -
--email=theodore@example.comspecifies the email parameter astheodore@example.com. -
--addr=Prince Street, Block 144, #19-14indicates the address parameter. You are providing the address asPrince Street, Block 144, Apartment 19-14. -
--tags=Disabledis used to assign a tag or label to the contact. In this case, you’re labeling or tagging the contact as ‘Disabled’. -
--note=Lactose Intolerantspecifies a note to be attached to this contact’s information. The note here is ‘Lactose Intolerant’. This is useful to attach additional information about an user.
You should see something similar to below.
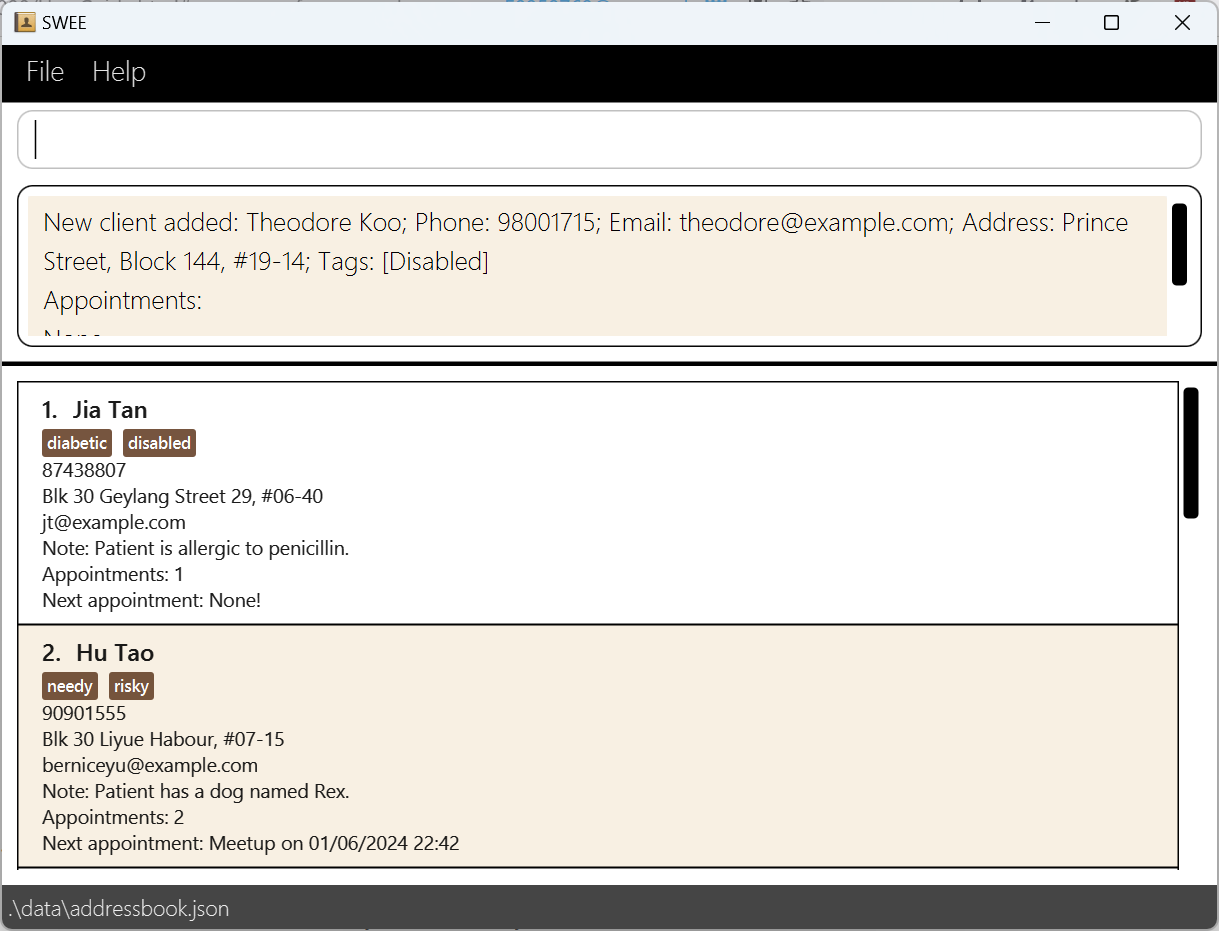
If you scroll to the bottom, you should see the client card of the newly added client.
Editing a client
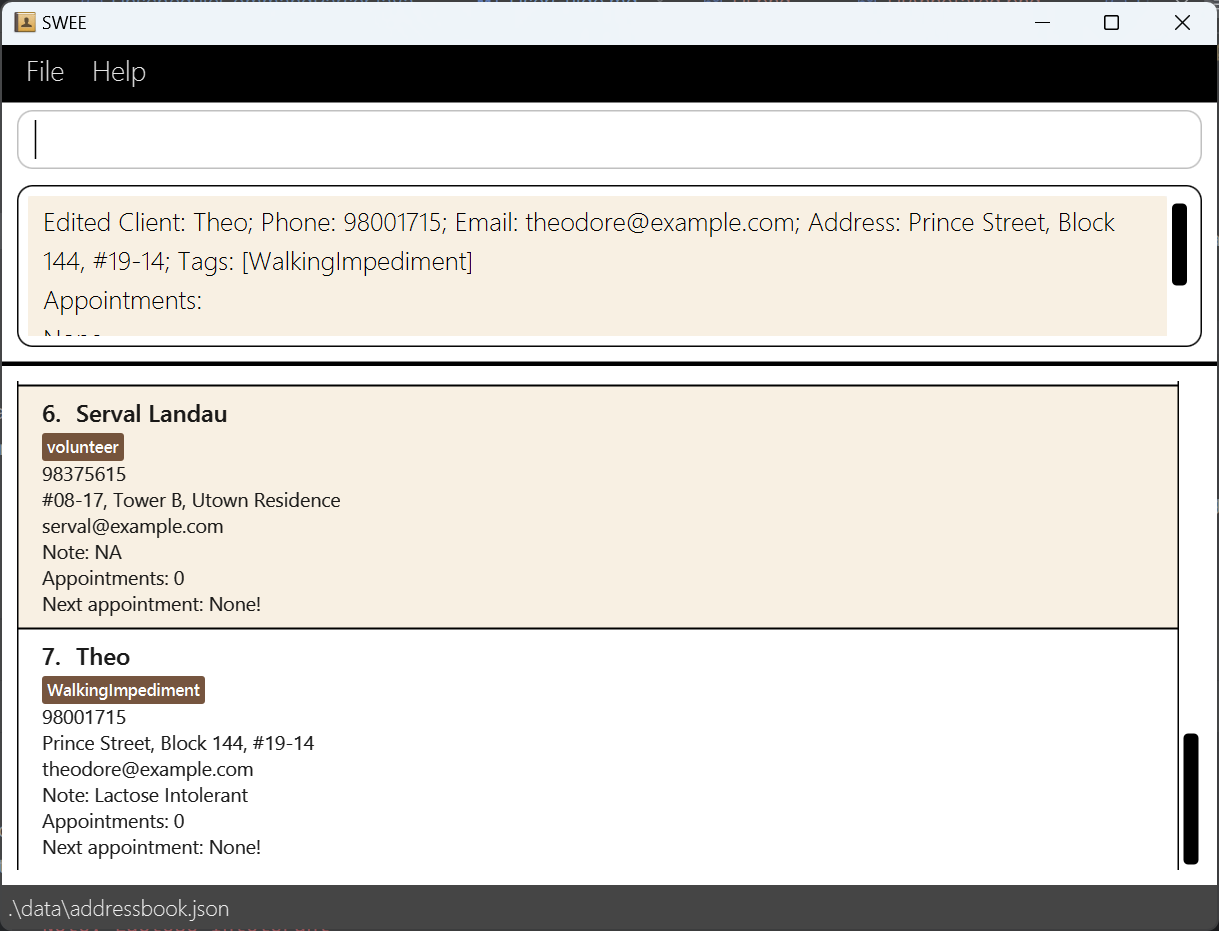
What happens if you made a typo or if information become outdated? edit provides a handy way to edit a client.
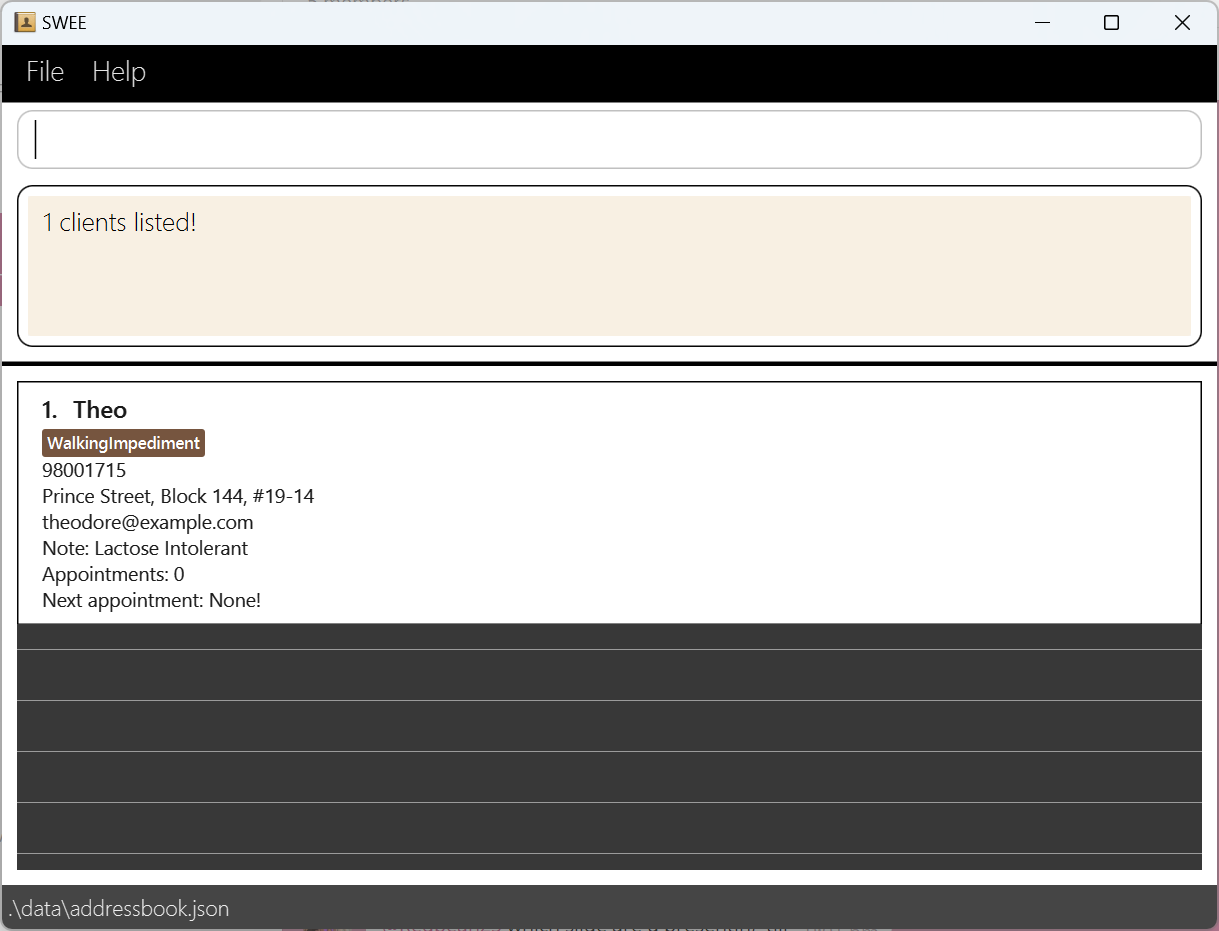
edit 7 --name=Theo --tags=WalkingImpediment
-
editThis is the command for editing a client. -
7refers to the index of the client we are editing. -
--name=Theospecifies the name parameter as Theo. This sets the client’s new name. -
--tags=WalkingImpedimentremoves all existing tags and Theo now only has this tag.
Finding a client by name
Now, we will find clients by their name.
find-name theo
-
find-nameThis is the command for finding a client by their name. -
Theospecifies the name parameter as Theo. This sets the keyword for the search.- It is possible to have more than 1 word, see
find-name.
- It is possible to have more than 1 word, see
- The client list will now display every client whose name contains at least one word in the keywords given.
Finding a client by tag
Similarly, we can also find clients by their assigned tags.
find-tag WalkingImpediment
-
find-tagThis is the command for finding a client by their name. -
WalkingImpedimentspecifies the tag parameter as WalkingImpediment. This sets the keyword for the search.- It is possible to have more than 1 tag, see
find-tag.
- It is possible to have more than 1 tag, see
- The client list will now display every client whose tag contains at least one word in the keywords given.
In this case, the exact same client will be shown as he is the only client with theWalkingImpedimenttag.
Viewing a client
Now we view a client at the specified index.
view 1
-
viewThis is the command for viewing a specific client. - The index is based on the current displayed clients.
- The information is shown in the command result box.
Deleting a client
Now we delete a client at the specified index.
del 1
-
delThis is the command for deleting a specific client. - The index is based on the current displayed clients.
- 💡 Observe that for commands using client index, it is always the index of the currently displayed clients.
- The command shows the name of the client being deleted in the command result box.
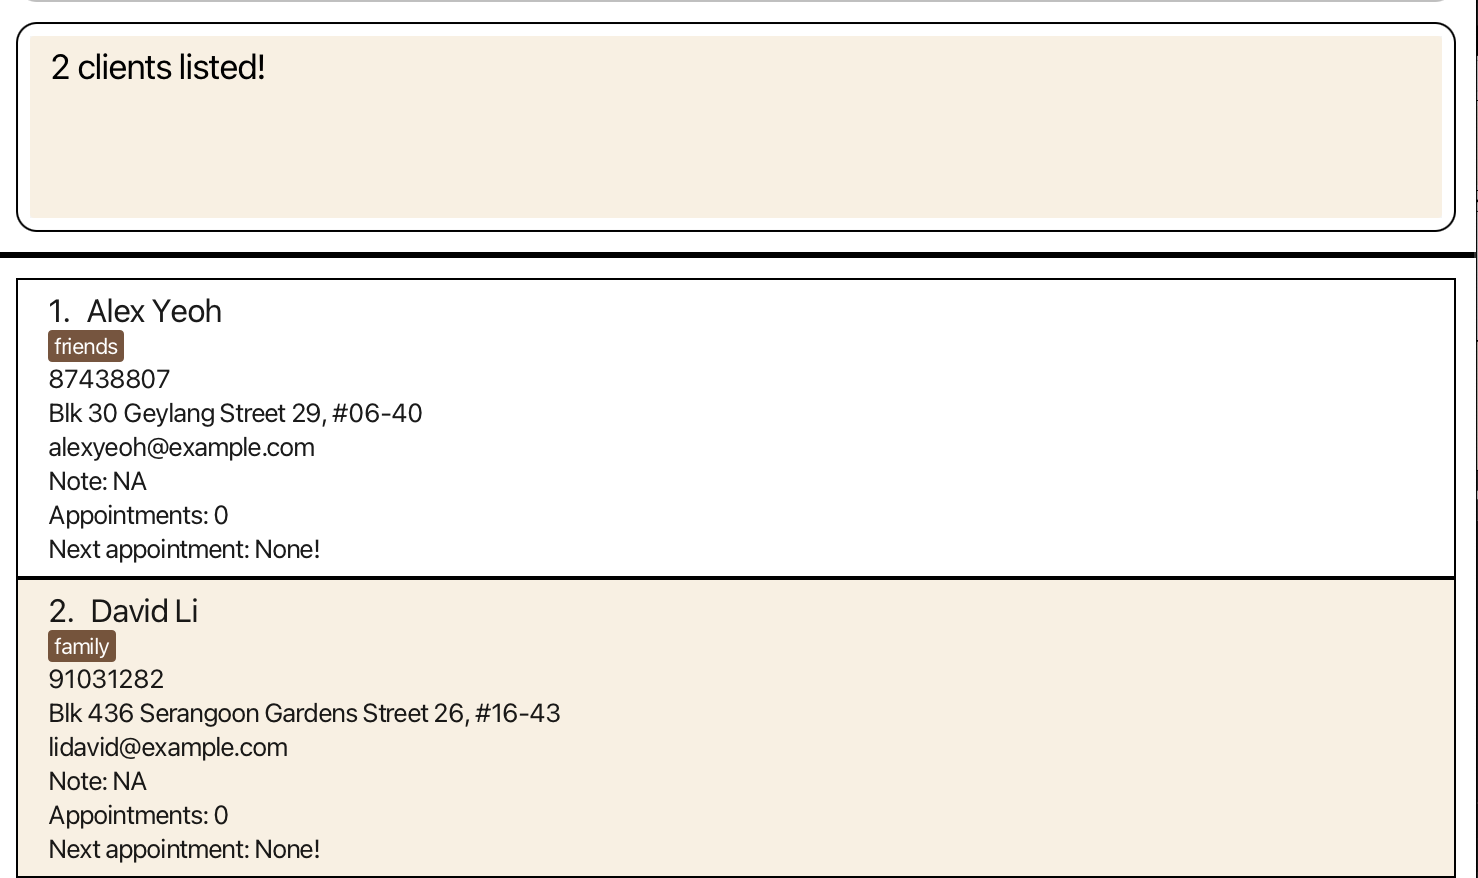
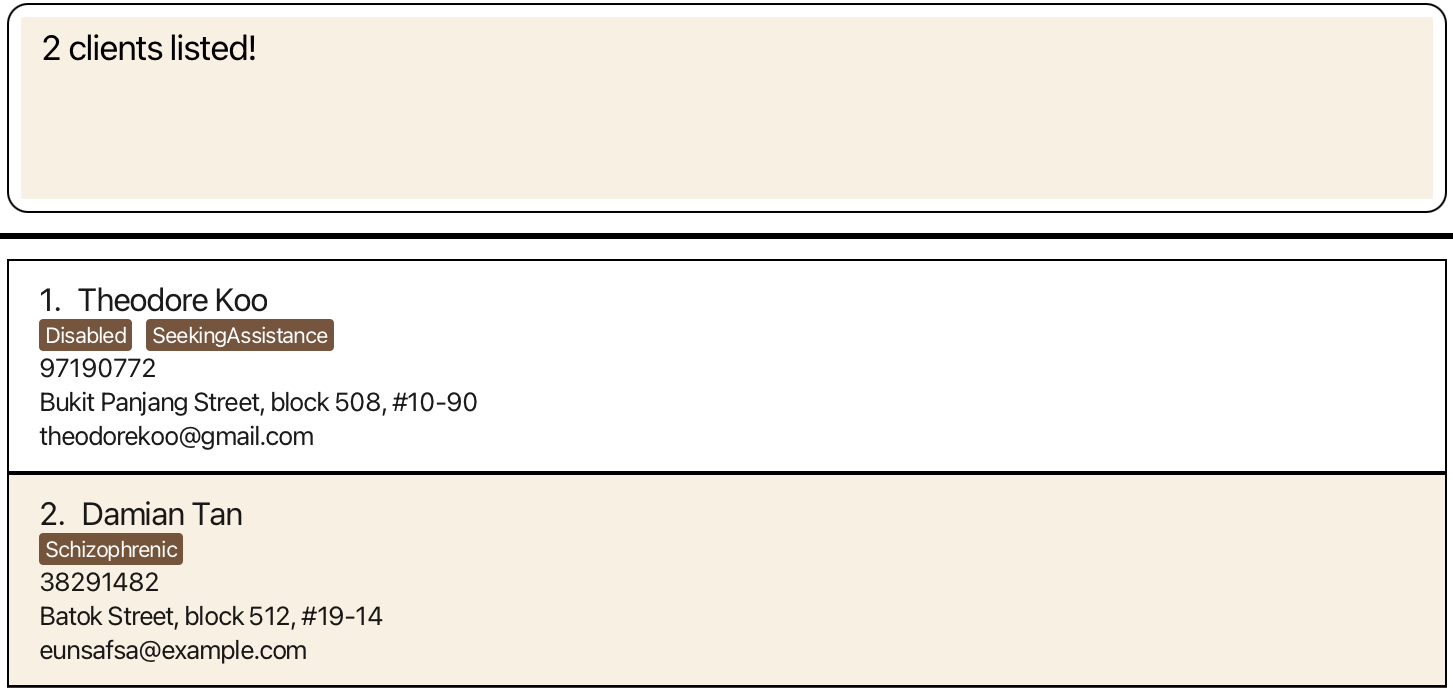
Listing all clients
Now with an empty list, we run a command to show all clients.
list
-
listThis is the command for listing all clients.
Exiting SWEE
Data is stored between usage of the application. We will exit and open the app again.
exit
-
exitThis is the command for exiting the application. - Open the application again. The clients are still there.
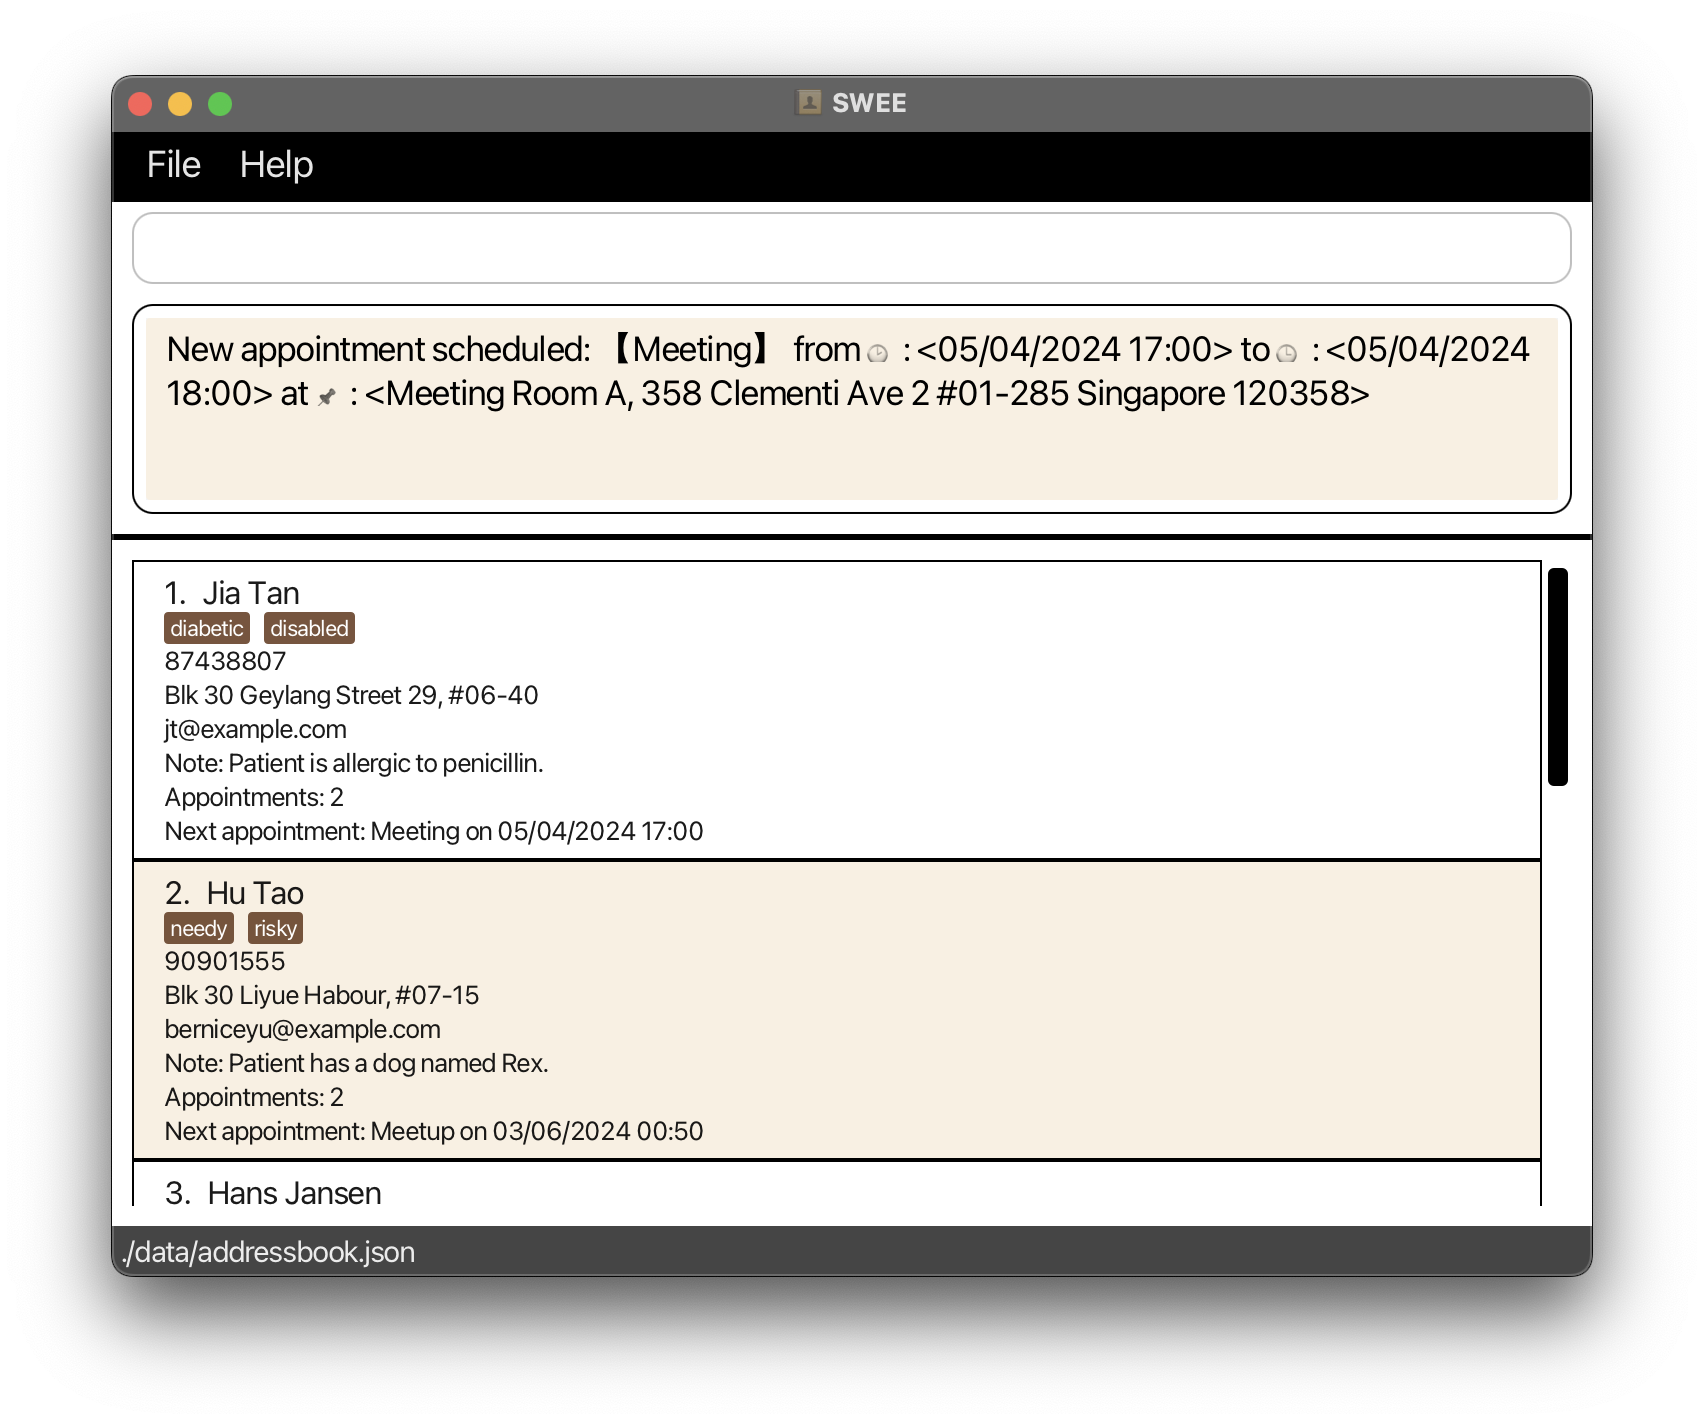
Scheduling an appointment for clients
Observe that Natasha (index 5) has no appointments. We will schedule an appointment. Make sure to set the date after today.
sched 5 --title=Lunch --from=14/05/2024 15:00 --to=14/05/2024 15:20 --addr=VivoCity
-
schedThis is the command for scheduling an appointment for a client. -
5is the index of Natasha. -
--title=is used to indicate the title of the appointment. -
--from=and--to=specifies the start and ending date and time respectively. - The format is
dd/MM/yyyy HH:mm: days/Months/year Hour:Minutes. The hours are in 24 hours format. - If you set the date to be in the future, you will realise the display of next appointment have changed as well.
- Observe that the total number of appointments increased.
- To see all of a client’s appointment use the
viewcommand, tryview 2to see Hu Tao’s appointments.
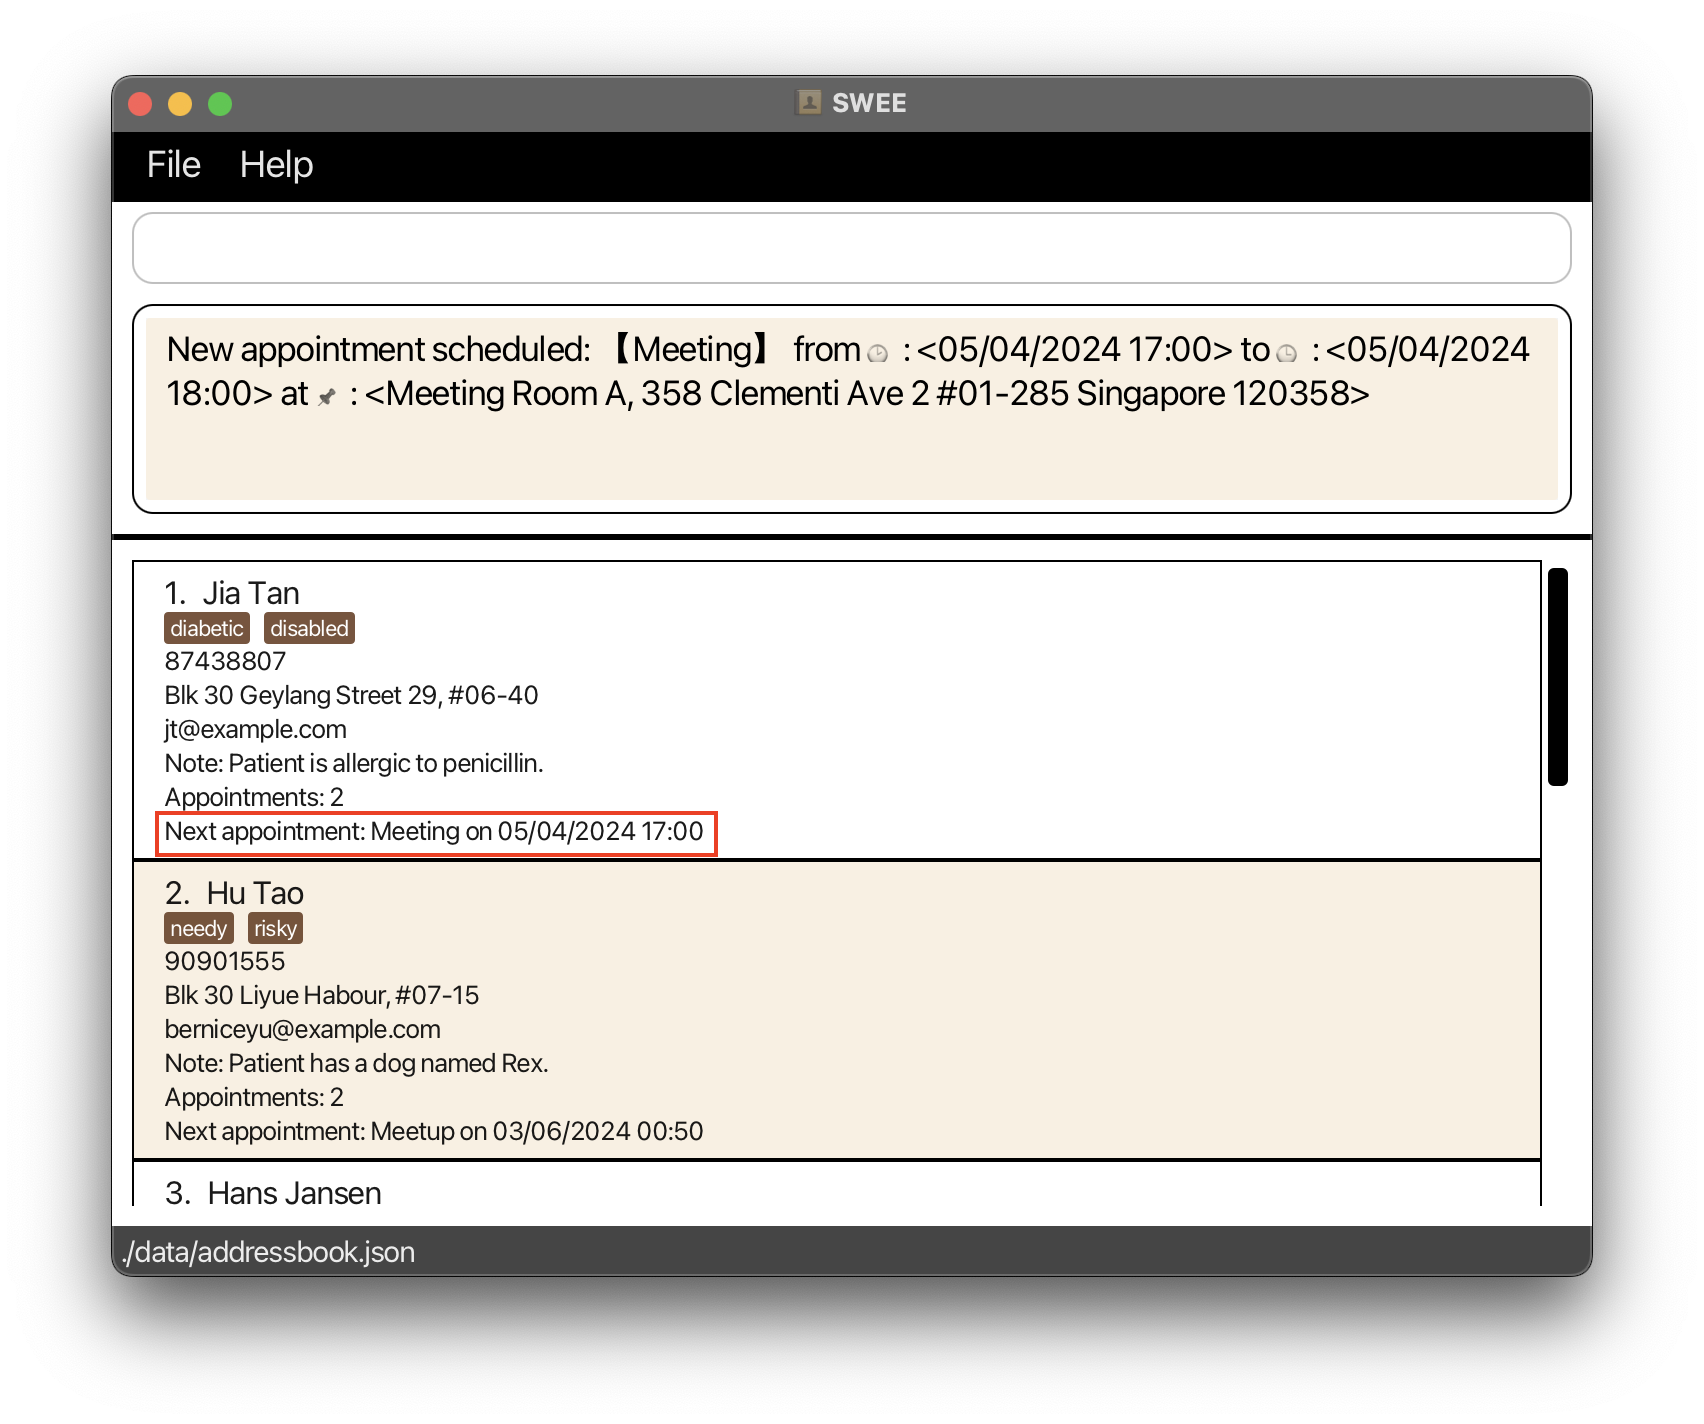
Unscheduling an appointment for clients
Observe that Hu Tao (index 2) has 2 appointments. We will unschedule an appointment.
unsched 2 --appt=2
-
unschedThis is the command for unscheduling an appointment for a client. -
2is the index of Natasha. -
--appt=specifies the index of the appointment to unschedule. In this case 2. - Notice that Hu Tao’s total number of appointments decreased and she no longer has an upcoming appointment.
Summary of Commands
| Action | Format, Examples |
|---|---|
| Add a client |
add --name=NAME --phone=PHONE_NUMBER --email=EMAIL --addr=ADDRESS [--tags=TAG] --note=NOTE e.g., add --name=James Ho --phone=22224444 --email=jamesho@example.com --addr=123, Clementi Rd, 1234665 --tags=friend --tags=colleague --note= Allergic to seafood
|
| Clear delete all clients in the app | clear |
| Delete a client |
del INDEXe.g., del 3
|
| Edit a client’s detail |
edit INDEX [--name=NAME] [--phone=PHONE_NUMBER] [--email=EMAIL] [--addr=ADDRESS] [--note=NOTE] [--tags=TAG]…e.g., edit 2 --name=James Lee --email=jameslee@example.com
|
| Find a client by name |
find-name KEYWORD [MORE_KEYWORDS]e.g., find-name James Jake
|
| Find a client by tag |
find-tag KEYWORD [MORE_KEYWORDS]e.g., find-name Disabled Risky
|
| List all clients | list |
| View client’s details |
view INDEXe.g., view 2
|
| Schedules an appointment |
sched INDEX --title=TITLE --from=DATETIME --to=DATETIME --addr=ADDRESSDATETIME in dd/MM/yyyy HH:mm formate.g., sched 1 --title=Monthly touchbase --from=14/03/2024 15:00 --to=14/03/2024 15:20 --addr=Meeting Room A, 358 Clementi Ave 2 #01-285 Singapore 120358
|
| Unschedules an appointment |
unsched CLIENT_INDEX --appt=APPT_INDEXe.g., unsched 1 --appt=2
|
| Help show help with link to this guide | help |
Features
Viewing help : help
Shows a message explaning how to access the help page.
Format: help
Adding a client: add
Adds a client to the address book.
Format: add --name=NAME --phone=PHONE_NUMBER --email=EMAIL --addr=ADDRESS [--tags=TAG] --note=NOTES
Important
- You cannot leave tags empty, i.e.
add --tags=with nothing for the tags. - Note is a compulsory field. If you have nothing to write for note, write
--note=NA. - Note cannot take in multiple entries e.g.
--note=Urgent --note=Complex. - If you have more than one client with the same name, please differentiate them by giving them different names.
- For example, you could include the clients’ last names.
- Note that clients with different names but same phone number, email or address can be added, as multiple clients might share such information.
- Names should only contain alphanumeric characters and spaces.
- Please do not input any hyphens or spaces in the phone number field. Just input the phone number as a continuous string of numbers with at least 3 digits.
Examples:
add --name=John Doe --phone=98765432 --email=johnd@example.com --addr=John street, block 123, #01-01 --note=Daughter is caretakeradd --name=Jane Doe --phone=92933578 --email=janed@example.sg --addr=Amy street, block 123, #11-02 --tags=Disabled --tags=SeekingAssistance --note=NA
Listing all clients : list
Shows a list of all clients in the address book.
Format: list
Editing a client : edit
Edits an existing client in the address book.
Format: edit INDEX [--name=NAME] [--phone=PHONE] [--email=EMAIL] [--addr=ADDRESS] [--tags=TAG] [--note=NOTES]
- Edits the client at the specified
INDEX. The index refers to the index number shown in the currently displayed client list. The index must be a positive integer 1, 2, 3, … - At least one of the optional fields must be provided.
- Existing values will be updated to the input values.
- When editing tags for a client, any pre-existing tags will be directly replaced with the new ones provided in the command.
This means that the tag update is not cumulative; unless a tag is specified in the new command, it will not be retained from the previous set of tags.
If the tag option is not specified, i.e.--tags=, the existing tags will be left as is. - You can remove all the client’s tags by typing
--tags=without specifying any tags after it. - Note cannot take in multiple entries e.g.
--note=Urgent --note=Complex.- This will only assign the latest note i.e. only
Complexis assigned.
- This will only assign the latest note i.e. only
- Please do not input any hyphens or spaces in the phone number field. Just input the phone number as a continuous string of numbers with at least 3 digits.
Examples:
-
edit 1 --phone=91234567 --email=johndoe@example.comEdits the phone number and email address of the 1st client to be91234567andjohndoe@example.comrespectively. -
edit 2 --name=Betsy Crower --tags=Edits the name of the 2nd client to beBetsy Crowerand clears all existing tags.
Viewing a client’s information: view
Displays the saved information about a client.
Format: view INDEX
- Displays client information at the specified
INDEX. - The index refers to the index number shown in the displayed client list.
- The index must be a positive integer 1, 2, 3, …
Examples:
-
listfollowed byview 2displays the information of the 2nd client in the address book. -
find Betsyfollowed byview 1displays the information of the 1st client in the results of thefindcommand.
Locating clients by name: find-name
Finds clients whose names contain any of the given keywords.
Format: find-name KEYWORD [MORE_KEYWORDS]
- The search is case-insensitive. e.g
hanswill matchHans - The order of the keywords does not matter. e.g.
Hans Bowill matchBo Hans - Only the name of the client is searched.
- Only full words will be matched e.g.
Hanwill not matchHans - Clients matching at least one keyword will be returned (i.e.
ORsearch). e.g.Hans Bowill returnHans Gruber,Bo Yang
Examples:
-
find-name JohnreturnsjohnandJohn Doe -
find-name alex davidreturnsAlex Yeoh,David Li
Locating clients by tag: find-tag
Finds clients whose tags contain any of the given keywords.
Format: find-tag KEYWORD [MORE_KEYWORDS]
- The search is case-insensitive. e.g.
disabledwill matchDisabled - The order of the keywords does not matter e.g.
disabled riskywill matchrisky disabled - Only the tag(s) of the client is searched.
- Only full words will be matched e.g.
diswill not matchdisabled - Clients matching at least one keyword will be returned (i.e. at least one is present)
e.g.disabled riskywill return clients that has at least one tag that isdisabledorrisky.
So clients with tagsdisabledanddiabetic, and a client withriskyanddiabeticwill be returned
Examples:
-
find-tag disabledreturns all clients who are taggeddisabled
-
find-tag disabled schizophrenicwill returndisabled,Schizophrenic
Deleting a client : del
Deletes the specified client from the address book.
Format: del INDEX
- Deletes the client at the specified
INDEX. - The index refers to the index number shown in the displayed client list.
- The index must be a positive integer 1, 2, 3, …
Examples:
-
listfollowed bydel 2deletes the 2nd client in the address book. -
find Betsyfollowed bydel 1deletes the 1st client in the results of thefindcommand.
Clearing all entries : clear
Clears all entries from the address book. Use this command with caution!
Format: clear
Exiting the program : exit
Exits the program and closes the window.
Format: exit
Scheduling an appointment: sched
Schedules an appointment for a client.
Format: sched INDEX --title=TITLE --from=START --to=END --addr=ADDRESS
- The
INDEXmust be a positive integer and a valid client index. - The
STARTandENDdates/times must be in the formatdd/MM/yyyy HH:mm. - The
ENDdate/time should not be earlier than, but can be equal to theSTARTdate/time. - It is possible to add appointments whose
STARTandENDtimes have already passed (for record-keeping purposes). - To view all the appointments for a client use
view INDEX. - A client can have multiple appointments at the same time at the same location with the same title as we do not want to limit what the user can or cannot add.
Example:
-
sched 1 --title=Meeting --from=05/04/2024 17:00 --to=05/04/2024 18:00 --addr=Meeting Room A, 358 Clementi Ave 2 #01-285 Singapore 120358adds the specified appointment for the client at index 1.
-
view 1will return all the scheduled appointments for the client at index 1.

-
Appointments refer to the total number of appointments the client has, including past and future appointments.

- Next appointment refers to the earliest upcoming appointment. If there is no upcoming appointment, ‘None!’ will be shown.
Unscheduling an appointment: unsched
Unschedules an appointment for a client.
Format: unsched INDEX --appt=APPT_INDEX
-
APPT_INDEXrefers to the index of the appointment for that specific client. - The
INDEXandAPPT_INDEXmust be positive integers and valid indexes of the client and appointment respectively.
Example:
-
unsched 1 --appt=2unschedules the appointment at index 2 for the client at index 1.

Saving the data
SWEE data are saved in the hard disk automatically after any command that changes the data. There is no need to save manually.
Editing the data file
SWEE data are saved automatically as a JSON file [JAR file location]/data/addressbook.json. Advanced users are welcome to update data directly by editing that data file.
Furthermore, certain edits can cause the SWEE to behave in unexpected ways (e.g., if a value entered is outside of the acceptable range). Therefore, edit the data file only if you are confident that you can update it correctly.
FAQ
Q: How do I transfer my data to another Computer?
A: Install the app in the other computer and overwrite the empty data file it creates with the file that contains the data of your previous AddressBook home folder.
Known issues
-
When using multiple screens, if you move the application to a secondary screen, and later switch to using only the primary screen, the GUI will open off-screen. The remedy is to delete the
preferences.jsonfile created by the application before running the application again. -
When adding tags that are longer than 202 characters, the tag itself and tags below it may be unable to be displayed properly and can be cut off due to the maximum screen size. For tags of length less than 200 characters, the full tag can be viewed if the application is in full screen mode (the above information was tested on a Macbook Air, the length may differ according to laptop size).
-
When adding and editing a new client, the client’s information may be cut off due to the maximum screen size. For parameters of length less than 130 characters, the full parameter can be viewed if the application is in full screen mode (the above information was tested on a Macbook Air, the length may differ according to laptop size).
-
It is possible to enter invalid dates such as 31/02/2025 (February usually only has 28 days on non leap years). Currently, the system will attempt to set it to the nearest valid date instead of rejecting the “invalid” date.
For example, any day beyond the last valid day-of-month will be set to the last valid day-of-month. -
On MacOS, when the application is in full screen mode and the help command is run, the help window will open in full screen as well. When the help window is closed, all application windows will be minimised.